If you are searching for how to create a bootable USB Pendrive you might find this article useful. For computer booting, we usually boot from a CD or DVD which is a traditional way for computer boot.
There are many drawbacks to using a CD or DVD for computer booting the bootable CD or DVD normally gets corrupted or becomes damaged as it’s very hard to maintain or keep safe from scratches.
So nowadays many professional and home users create bootable pen drives for installing new and fresh operating systems to their computers or laptops.
You can find many articles on the web when you google them but here I am going to share every possible way to make a bootable USB pen drive or flash drive.
Bootable or startup pen drives are mainly used to repair corrupt operating system files that are damaged by accidentally deleting or updating files that are necessary for an operating system to perform to its full potential.
The operating system may be corrupted by some of the viruses that are spread over the internet and when these types of viruses come in contact with our hard disk they infect some of the important system or operating system files that are necessary for normal computer booting.
Also Read- How to Boot Computer From a CD or DVD
- How to Boot Computer From USB Pendrive
- How to Create a Dos Bootable USB Pendrive
- Create a Bootable Pendrive in 4 Clicks
What is a Bootable USB pen Drive or Flash Drive
A bootable USB Pendrive or flash drive is a device when used can install an operating system on our computer hard disk.
To make a bootable USB device there are some requirements such as you will need an iso image of the operating system.
Let’s say you want to create a USB bootable pen drive of Windows XP you will surely need an iso file of Win XP or you need to create a startup pen drive of Windows 7 you must have an iso image of Win 7.
Same for Linux and Ubuntu.
secondly, you can insert your Windows OS CD or DVD directly inside DVD-RW where the software fetches all files and folders needed for making a bootable pen drive.
Hope I have cleared this essential requirement if you don’t have an iso image you can simply copy all files of the operating system from your bootable CD or DVD to your hard disk so that when the software that we are going to learn below prompts us for files you can browse the computer and locate them.
Here are the download links where you can download all important operating systems with a click.
By using the given methods you can create your own bootable USB pen drives for all other Windows operating systems there are no different ways for other operating systems.
If you are successful in creating 1 bootable medium surely you can also make it for other OS.
Secondly, you must have a good quality pen drive preferably using more than 8 GB as it would be more convenient during the process as the newer operating systems are huge you must have a flash drive with a decent amount of space available.
I use a flash drive with a capacity of more than 16 GB another important thing to remember is that your pen drive must support USB 2.0 or 3.0 for a faster transfer process while creating a bootable medium.
How To Create a Bootable USB Pendrive or Flash Drive
I] Use Pen drives that have a capacity of more than 8 GB. To avoid insufficient space errors while the process is undergoing for creating a bootable USB flash disk.
It would be frustrating when this error pops up. So kindly take a note.
II] You will need free software for your task I use Novicorp Win To Flash Software which is extremely easy to operate and handle.
I have used this software for many years without any problems. Download Novicorp Win To Flash Software
III] Important stage of the process here you must have an ISO image of the OS if you don’t have kindly download it from the above links I have mentioned.
Secondly, if you have a CD or DVD of any operating system which you wish to make bootable copy all the files and folders for the source to your hard disk and keep it safe as Novicorp Win To Flash Software is going to prompt you for the location where they are stored.
Here We have a choice to either use ISO image or use copied Windows system files which we have copied before on our hard disk.
The choice is yours….but you must make sure that your source CD or DVD is error-free so that you make an error-free bootable pen drive & don’t face any future complications.
STEP 1:: When Download is finished we will get a zip file named Novicorp win To Flash extract on your hard disk and locate the .exe file to install software in your PC after double-clicking the .exe file your software installation process will start.
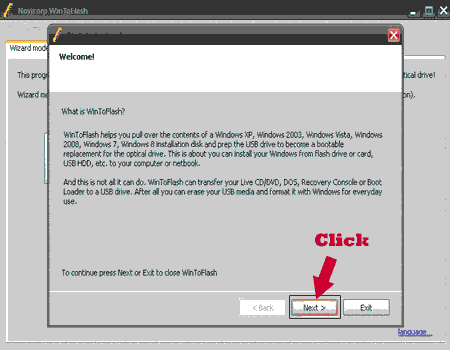
STEP 2 :: Click Next
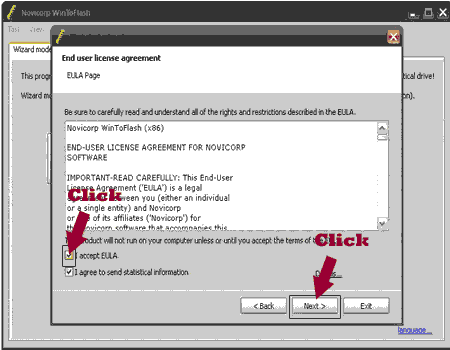
STEP 3 :: Click Next
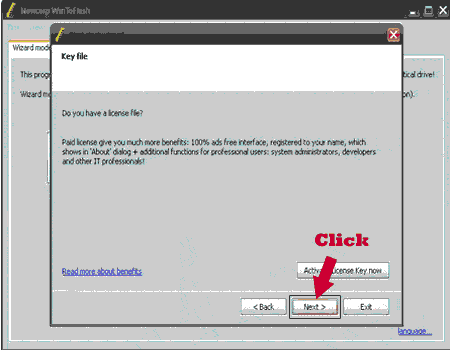
STEP 4 :: Click Next
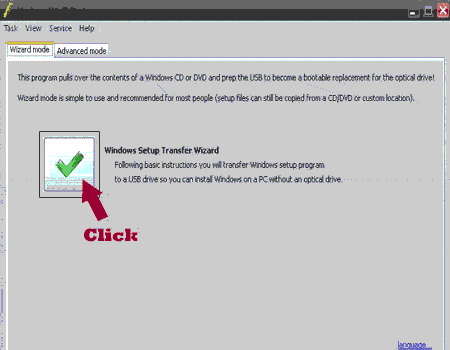
STEP 5 :: Click Next
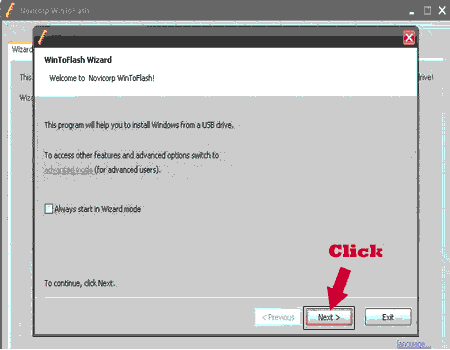
STEP 6 :: Click Next
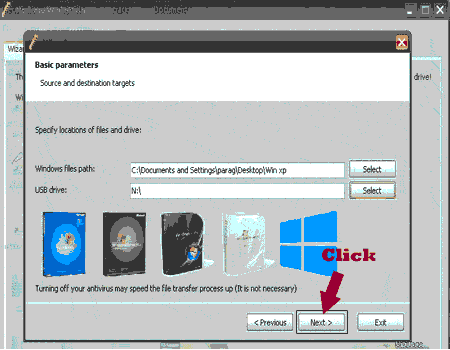
Windows File Path –(Select your Windows Source It Can be Windows 8 DVD, Windows 8 ISO Image, Or previously copied Source in Hard disk).
USB Drive———- (Drive Assign To Pen drive: Here my Pen drive’s Assign drive letter is N)
STEP 7 :: Click Next
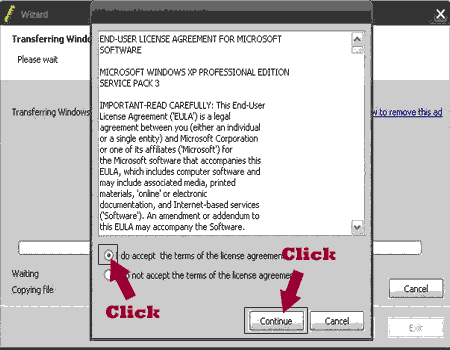
Step 8 :: Click Next
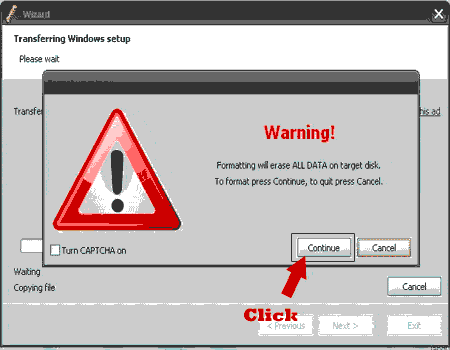
Now here is an important notice that you may need to pay attention the software prompts us that it will erase all data from your removable disk.
That is it will format all data from your USB pen drive so be careful and back up all your important data to any other destination that may be on a hard disk or any other flash drive. If you don’t have any important data present there click on NEXT.
Step 9 :: Finished
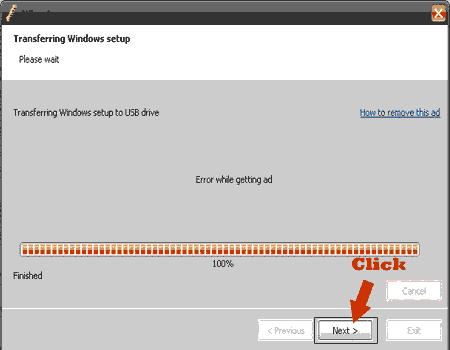
Click On Next (Congratulation: You have Successfully Created a Bootable Pendrive)
Tip:: Use the Same process for win7, vista, win8, win 8.1, etc…Now go to the Bios setting and make the necessary change and boot your system using this pen drive .. You can also copy software that is presented in your hard disk [HDD] directly to the new pen drive which we have just created for installing the software which is required after the operating system is installed in a computer.
Also ReadCreate a bootable USB Pendrive for XP -7-8-10 Using Rufus
Now here again there are several ways to create a bootable USB flash| pen drive. Rufus is another excellent software that allows us to create a startup drive.
Rufus is again very tiny software but very powerful which helps us to fulfil our goals in no time. So I will directly jump to the point.
Necessary Requirements For Using Rufus Software
- Use Pendrive Whose capacity is more than 8 GB
- You will need Rufus Software Download Here
- ISO image file Windows XP,7,8 or 10
Open your Rufus software by just double-clicking it and you will see like below picture.
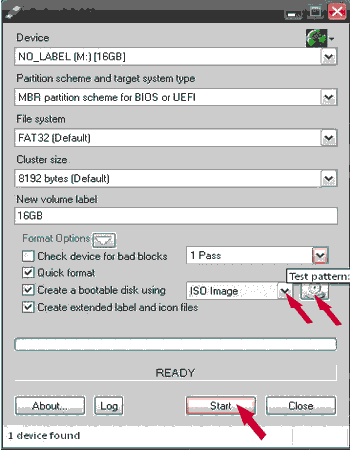
- Step 1:: Connect Your Pendrive to one of the USB Ports available in your computer case or cabinet which are normally located at the backside or front side.
- Step 2:: Click on the device option and you will be able to see your Pendrive with label and size. Select
- Step 3:: Now it’s time to select the ISO image that you have downloaded from the above link which I have mentioned before.
- Step 4:: Before clicking on start it’s important to back up all the data present in the pen drive as Rufus software intentionally erases all data inside your USB STICK..so be careful here..
- Step 5:: Click on the start button present on the left-hand side of the software that you are currently viewing. Wait for some time the time consumed to create a bootable USB FLASH or Pen drive depends entirely upon the size of the operating system & the speed of your computer or laptop.
Now after making a bootable USB Stick go to CMOS |BIOS configuration and change the boot order 1st to your Pendrive.
After Completing these steps you can now successfully you’re your computer or laptop using thumb drive you recently created.
Also Read- What is a Computer Motherboard
- Different Types of Motherboard
- What is a Computer
- What is Computer Hardware and Software
Important Tip:: Now as your Memory Stick is created you can save the necessary software which you will install once the operating system has been successfully installed on your computer’s hard disk drive.
Make Bootable USB Pendrive Using Dos Command [DISKPART]
The Diskpart is an external dos command that is available in the majority of Windows operating systems such as Windows XP 7 8 10 and 10.0.
Dispart command is a recovery console command that helps us to delete, create, erase, clean, and even format the internal hard disk using FAT 32 & NTFS.
The Diskpart command can be used in internal hard disk drives as well as removable disks such as USB FLASH DRIVES & PENDRIVES Diskpart command is a very useful command & it’s very powerful as it operates using administrative rights with all privileges.
Complete Use of the Diskpart command to make USB FLASH DRIVE
Step No 1:: Simply click on the start menu and in the dialog box type diskpart now a pop window will appear to locate the diskpart command which is placed at the top.
Secondly, right-click on diskpart and choose Run as administrator.
The picture is shown below
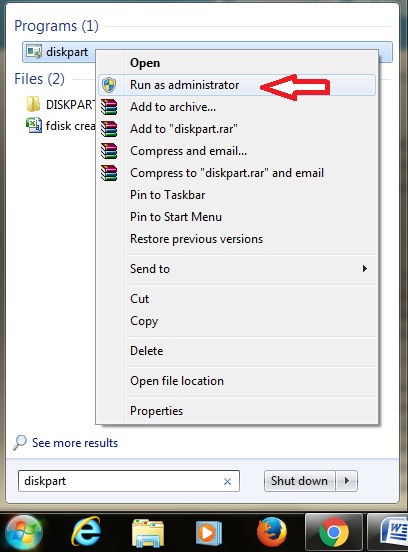
STEP NO 2 :: As Now the diskpart utility pops up just type list disk and hit enter. [Here this command is used to check the available disk attached to your computer]
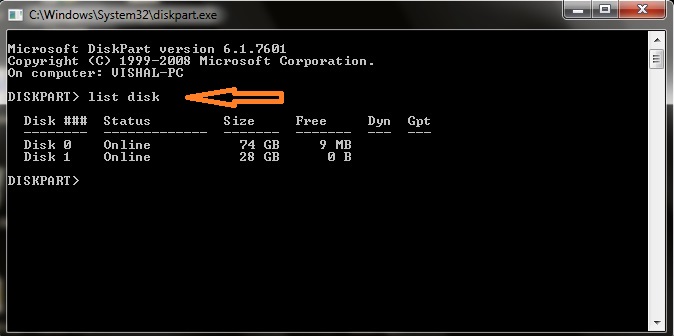
STEP NO 3:: Now select the disk that you want to make bootable generally it is displayed as Disk 1. Just type LIST DISK and press the enter key from the keyboard.

STEP NO 4:: Now type SELECT DISK 1 and hit the enter key from the keyboard.
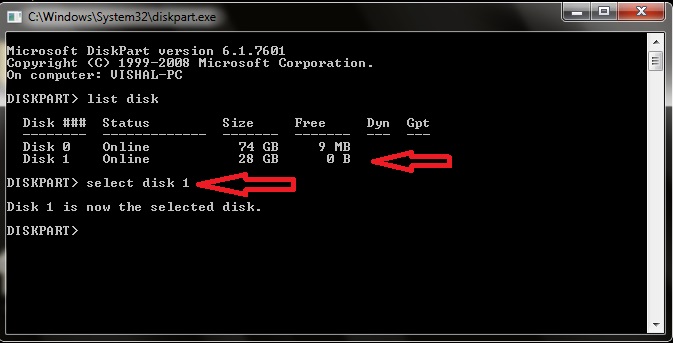
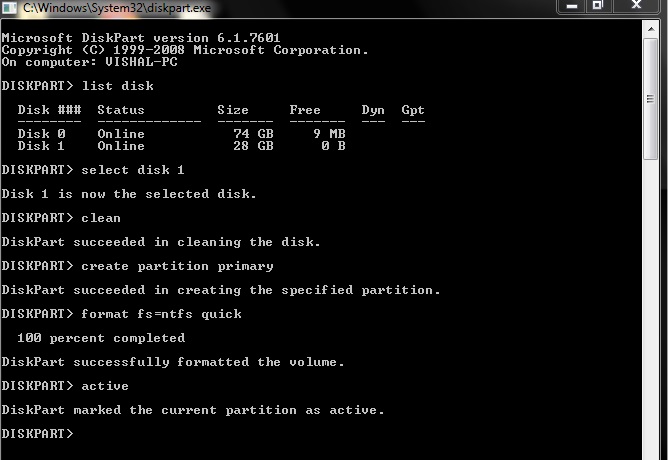
STEP NO 5:: Type CLEAN

STEP NO 6:: Here in this step, you have to create a primary partition therefore type CREATE PRIMARY PARTITION and hit the enter key from your keyboard.

STEP NO 7:: In this step, you have to format your Pendrive to make it useable.
You can format using file system 1]FAT [File Allocation Table] 2] NTFS [New Technology File System]. Type FORMAT FS=NTFS QUICK & hit the enter key. Note:: quick is here used for quick format.

STEP NO 8:: You just have to type ACTIVE.

STEP NO 9:: You have successfully formatted and made the drive active. Finally, go to your Windows CD or DVD copy all files and folders and paste in the newly created USB Pendrive.
Below I am going to show you all diskpart commands in one go ..
![How To Create A Bootable USB Pendrive [Simple Steps] 1 How To Create A Bootable USB Pendrive](https://www.chtips.com/wp-content/uploads/2021/05/How-To-Create-A-Bootable-USB-Pendrive.webp)